To have a good garden, you must first understand your USDA zone map. This important book helps gardeners figure out which plants will do well in their area's temperature. If you know your plant hardiness zones, you can choose better plants, keep your garden healthy, and enjoy it year after year.
The temperature differences in different parts of the United States are different, which affects how plants grow and stay alive. With the USDA zone map, the country is split into zones based on the average lowest temperature in the winter each year. By using this map to find your garden's location, you can carefully plan when to plant things and pick plants that do well in your area.
Gardening Zones in the USA and Their Importance
Zone 9
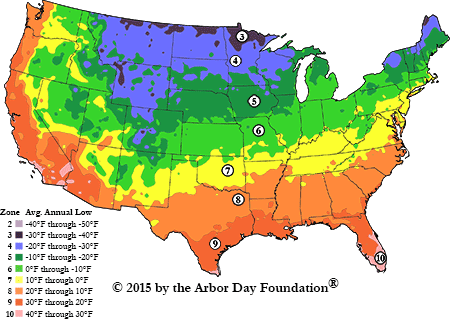
For every gardener, knowing the gardening zones USA is very important. The US Department of Agriculture (USDA) made these zones to help people choose plants that will do well in different climates and temperatures. The average lowest temperature in the winter is 10 degrees Fahrenheit different in each zone.
When you look at your USDA planting zones, you can see what plants are most likely to do well living in your area. For example, winters in Zone 3 are very cold, while summers in Zone 9 are warm enough for tropical plants to survive.
Why USDA Zones Matter
- They tell gardeners when to plant and prune, so trees, shrubs, and flowers have a better chance of doing well
PAWPAW TREE
- They help gardeners avoid putting plants that can't handle the winter weather where they live
zone 9
TN Nursery has many plants that do well in certain climates. Like, the Apple Tree does best in cooler areas in the north, while the Pawpaw Tree does best in mild to warm areas.
When you know your plant hardiness zones, you can make choices that will help your garden grow well and last for a long time.
Best Plants for Different USDA Zones
Zone 9
Under the gardening zones USA map, the United States is split into 13 main areas, each with its own weather conditions. By choosing plants that do well in your area, you can cut down on upkeep, water use, and plant stress. There are many great plants for each zone, which you can see below.
Zones 3 through 5
Zone 9
Apple trees, lilacs, and other cold-hardy plants do well here. These plants can handle hard winters and come back beautifully every spring.
Zones 6 through 8
Zone 9
Zone 9
A lot of the middle and southern U.S. is in this range. This is a great spot for plants like Pawpaw Trees, Creeping Phlox and Hydrangeas. These do well in climates with mild winters and warm summers.
Zones 9 through 11
Information
In these hot places, like some parts of Florida and California, tropical plants like hibiscus, gardenia, and bougainvillaea can grow.
By choosing plants that are right for your zone, you can keep your garden healthy and colourful all year long. With the growing zones map, you can plan your yard with confidence and keep plant loss to a minimum.
Using the USDA Planting Zones for Successful Gardening
If you know your USDA planting zones, you can grow more efficiently and with less work.
Once you know your zone, you can make a planting routine that works with the weather where you live.
Here's how to get the most out of the USDA zone map:
- Find your zone: To find your zone, go to the official USDA website and type in your ZIP code.
- Make sure your plants go together: Look at the list of zones that each plant should grow in before you buy it. This information is in all of TN Nursery's product descriptions.
- Take into account microclimates: Keep in mind that shade, sunlight, and bodies of water close can all slightly change the temperature in your yard.
The Role of Hardiness in Gardening Success
Plant hardiness zones are very important because they show how well a plant can handle cold weather. If you pick a plant that doesn't do well in your zone, it might not make it through the frost or even die. But picking plants that do well in your area, like the Apple Tree or Creeping Phlox, will ensure long-term success.
No matter where you live, this careful way of planning your garden will help you make a strong and beautiful one.
Making the Most of the USDA Plant Hardiness Zone Map
It's not just a map; the USDA plant hardiness zone map is a gardener's road map to success. Here is how to maximise its benefits:
- Plan based on the seasons. Use the map to figure out when to plant and gather.
- Plant a variety of native and modified species to make your garden more resilient.
Watch for changes in your area: Changes in the weather can move your zone a little over time, so stay up to date.
If you live between two climate zones, choose plants that can grow in both. Pawpaw Trees, for instance, do well in Zones 5–9, giving gardeners in changing conditions a lot of options.
Carefully using the growing zones map will help you grow a garden that does well in your area, needs less care all year, and adapts easily to its surroundings.
FAQs
Hydrangea
What is the USDA Zone Map?
Based on average winter temperatures, the USDA zone map divides the U.S. into regions that help gardeners choose plants that can live in their area.
How can I find my growing zone?
If you put your ZIP code on the official USDA website, you can find your exact zone.
Why are plant hardiness zones important for gardeners?
They help your plants survive and grow faster by making sure they can handle the coldest weather in your area.
Hydrangea


